Learning Adobe Photoshop CC (2022)
by Greg Bowden (806 pages)
 |
The Learning Adobe Photoshop CC tutorials provide activity-based graphics editing lessons to teach or learn Adobe Photoshop CC 2022.
Tutorials for Adobe Photoshop CC 2020, 2017 and 2015 are also available, contact us if you prefer those.
The tutorials are provided in three modules:
Module 1 introduces the Adobe Photoshop CC basics. Module 3 provides extended applications of Photoshop CC. |
Selected individual chapters can be purchased separately. A link is provided next to those chapters in the list below.
Support files providing all the images, videos and text are included with the product.
There are chapter descriptions and more details below, and a sample book with the first few pages of each chapter can be downloaded from the following zip file: |
|
Prices (Including GST)
Prices are in Australian dollars and include GST. For purchases outside Australia, the 10% GST (tax) is removed from the price. |
||||
If you are ordering using a school Purchase Order Number, please complete the Order Form. |
||||
If you are purchasing using a Credit Card or PayPal, select the ADD TO CART button next to the required module. |
||||
Photoshop CC Module 1 Single-user, $15.40 |
Photoshop CC Module 1 Multi-user, $176.00 |
|||
Photoshop CC Module 2 Single-user, $15.40 |
Photoshop CC Module 2 Multi-user, $176.00 |
|||
Photoshop CC Module 3 Single-user, $15.40 |
Photoshop CC Module 3 Multi-user, $176.00 |
|||
- Chapters and Sample Pages
- More Details
Module 1: Photoshop CC Basics
Contents (Modules 1, 2 & 3) |
view pages (499k) |
Chapter 1: Introduction to Photoshop CC (23 pages) |
view sample pages (1.546 Mb) |
Chapter 2: Selecting Parts of Images (27 pages) |
view sample pages (1.25 Mb) |
Chapter 3: Modifying Images (21 pages) |
view sample pages (1.11 Mb) |
Chapter 4: Drawing Shapes (22 pages) |
view sample pages (1.55 Mb) |
Chapter 5: Adjusting Shapes (13 pages) |
|
Chapter 6: Creating a Detailed Sketch (23 pages) |
view sample pages (1.25 Mb) |
Chapter 7: Adding Text to Designs (26 pages) |
view sample pages (1.3 Mb) |
Chapter 8: Adjusting the Look of Images (20 pages) |
view sample pages (1.75 Mb) |
Chapter 9: Combining Photographs (12 pages) |
|
Chapter 10: Creating Clipping Masks (18 pages) |
view sample pages (1.35 Mb) |
Chapter 11: Adjustment Layers (15 pages) |
|
Chapter 12: Colour Adjustments (13 pages) |
|
Chapter 13: Saving Files (13 pages) |
|
Project 1: Create a Poster (Multi-user only) |
|
Module 2: Photoshop CC Advanced Exercises
Chapter 14: Repairing Images & Moving Content (15 pages) |
|
Chapter 15: Removing Objects From Images (18 pages) |
view sample pages (1.18 Mb) |
Chapter 16: Refining Selections (18 pages) |
view sample pages (1.88 Mb) |
Chapter 17: Advanced Layer Uses (17 pages) |
|
Chapter 18: Applying Filters (31 pages) |
view sample pages (1.95 Mb) |
Chapter 19: Applying Artistic Filters (16 pages) |
|
Chapter 20: The Camera Raw Filter (19 pages) |
|
Chapter 21: Sky Replacement and Neural Filters (17 pages) |
view sample pages (1 Mb) |
Chapter 22: Working With Perspective (18 pages) |
view sample pages (1.29 Mb) |
Chapter 23: Artistic Brushes (28 pages) |
view sample pages (1.39 Mb) |
Chapter 24: Creating Animations (26 pages) |
view sample pages (1.37 Mb) |
Chapter 25: Using Artboards and Frames (28 pages) |
view sample pages (1.62 Mb) |
Chapter 26: The Curvature Pen Tool (20 pages) |
view sample pages (1.95 Mb) |
Chapter 27: Useful Tools (18 pages) |
|
Project 2: VicSports (Multi-user only) |
|
Module 3: Photoshop CC Applications
Chapter 28: Reflections and Symmetry (16 pages) |
view sample pages (1.1 Mb) |
Chapter 29: Creating 3D Styles (16 pages) |
|
Chapter 30: Graffiti on a Brick Wall (14 pages) |
|
Chapter 31: Graffiti on a Building (22 pages) |
view sample pages (1.1 Mb) |
Chapter 32: Creative Text Effects (12 pages) |
|
Chapter 33: Displacing Images (9 pages) |
|
Chapter 34: Using Blurs in Animations (16 pages) |
view sample pages (1.3 Mb) |
Chapter 35: Timeline Animations (16 pages) |
view sample pages (1.63 Mb) |
Chapter 36: Creating Videos (14 pages) |
|
Chapter 37: Creating Balls and Spheres (16 pages) |
view sample pages (1.3 Mb) |
Chapter 38: Creating Accurate Shapes (20 pages) |
view sample pages (1.52 Mb) |
Chapter 39: The Mixer Brush Tool (14 pages) |
|
Chapter 40: The Pen Tool (22 pages) |
view sample pages (1.92 Mb) |
Chapter 41: The History Panel and History Brush (15 pages) |
|
Chapter 42: Extension Chapter: 3D Tools - Multi-user only (39 pages) |
|
The tutorials are designed to be used on screen next to the software package using Adobe Acrobat Reader, from a tablet or printed.
Assignments are provided at the end of each chapter and the multi-user version provides projects at the end of each module.
Support files that provide all the images and data required to complete the activities are included with the product. |
 |
Module 1
Introduces the Adobe Photoshop CC basics including layers, workspaces, drawing tools, selection techniques (the Object Selection tool, the Quick Selection tool, the Magic Wand tool and the Quick Mask tool), modifying images, applying filters including the Liquify filter, creating artistic sketches, combining shapes and photographs, adding text to designs and applying Glyphs, adjusting the look of photographs, using masks and Adjustment layers, and saving files in different formats and for the web.
Module 2
Covers advanced Adobe Photoshop CC features including cloning parts of images, applying Content Aware Move and Content Aware Fill, applying full and partial blur filters to images, using smart filters, the Smart Sharpen filter, the Shake Reduction filter and Camera Raw filters, refining selections, selecting skin tones, improving photographs of faces, replacing skies and applying neural filters to improve skin tones, adjust facial expressions and to colourise old photos, using Brushes and Brush settings, working with perspective, creating animations, creating artwork, using Artboards and Frames, using the Curvature Pen tool, using the Magnetic Lasso tool and the Puppet Warp tool, replacing colours in images and using Content Aware Scaling.
Module 3
Provides some applications of Photoshop including the use of reflection and the Symmetry Tool, using the Mixer Brush, creating three-dimensional objects such as spheres and boxes, creating and saving 3D styles, creating graffiti on a brick wall and on a building, creating accurate designs, displacing one image into another to add depth and motion to a 2D image, animation exercises using frames and the Timeline panel, creating videos for YouTube and other media, creating shapes with the Pen tool and using the History panel.
Module 1 Chapter Descriptions
Chapter 1: Introduction to Photoshop CC
This chapter introduces the Photoshop CC basics such as the screen sections, the Tools panel, Zoom tools, the navigation techniques, adjusting workspaces, the screen interface and how to use layers, including how to turn layers on and off, add new layers, delete,layers, name layers, change the layer order and change the layer opacity.
Chapter 2: Selecting parts of Images
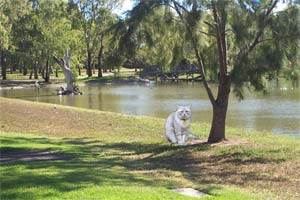
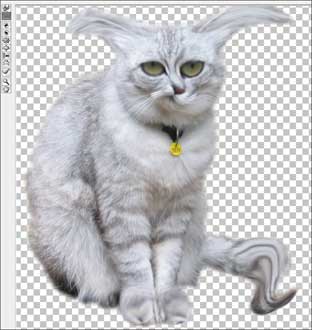
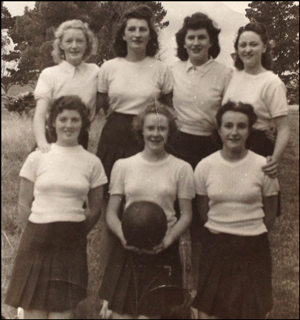
This chapter demonstrates how to select parts of images and photos. This includes using the Edit Marquee tools, the Lasso tools, the Object Selection tool, the Quick Selection tool, the Magic Wand and the Quick Mask tool, which are used to select a cat in one photo and transfer it to another.
Chapter 3: Modifying Images
Demonstrates how to modifying images and photos using the Liquify Tool and the Filter Gallery.
Chapter 4: Drawing Shapes
Demonstrates how to use the drawing tools such as rectangles, ellipses, lines and custom shapes, then adding effects to those shapes. Students are shown how to combine photos with shapes, for example, placing a photo within a frame shape.

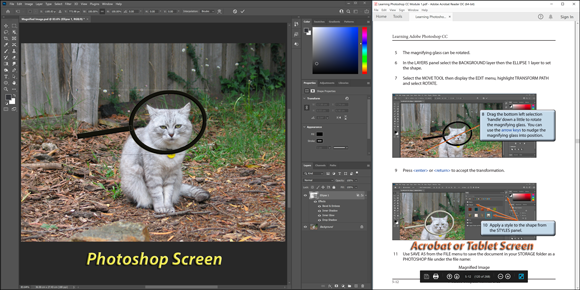
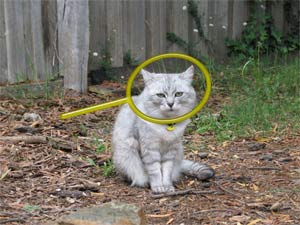
Chapter 5: Adjusting Shapes
Demonstrates how to combine shapes and photos together to create designs. As an example, students are shown how to magnify a cat's head then draw a magnifying glass over it.
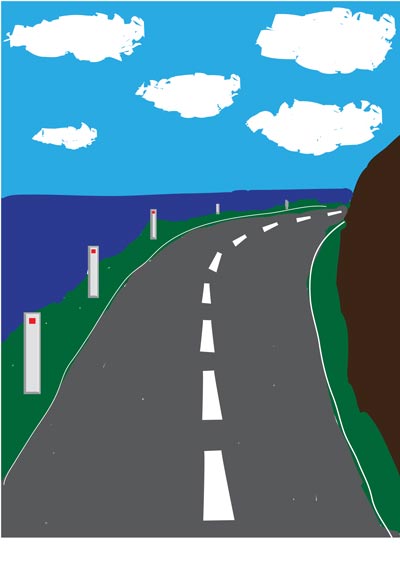
Chapter 6: Creating a Detailed Sketch
Demonstrates how to use the drawing and painting tools to create the following artwork. The Brush tool is used to create the outline of the sketch, the Paint Bucket tool is used to fill the sections with colour and layers are duplicated and modified to produce the road lines and white posts..
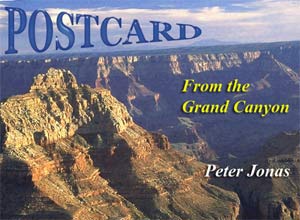
Chapter 7: Adding Text to Designs
This chapter shows students how to enter text and apply effects to that text such as colour, text warp, style effects, 3D effects, typing text along a path, using Glyphs and more detailed text formatting. Text is then added to photos and images, for example the following poster is created:
Chapter 8: Adjusting the Look of Images
Shows students how to edit and improve photographs using many of the tools that Photoshop provides. Some of the tools used include the Blur tool, the Sharpen tool, the Smudge tool, the Sponge tool, the Dodge tool, the Burn tool, Gradient Fills, the Red Eye Reduction tool, Brightness/Contrast Adjustment layers, Colour Balance Adjustment layers and removing background tools.
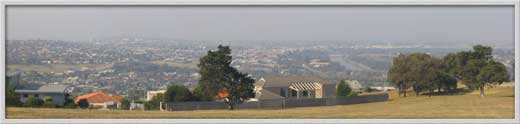
Chapter 9: Combining Photographs
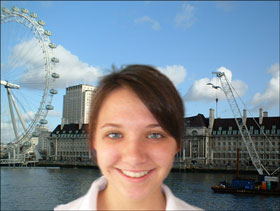
Demonstrates how to use the Photomerge tool to combine multiple photos. Students are then shown how to adjust the combined photos to improve the panoramic effect and how to use the Crop Tool to exclude parts of the combination that are not needed.
Chapter 10: Creating Clipping Masks
Introduces students to the concept of masks so that just wanted parts of images are displayed. Different types of objects are used as masks, including marquee selections, custom shapes and text.

Chapter 11: Adjustment Layers
The applications of Adjustment layers are demonstrated to improve the appearance of photographs. The examples covered are Exposure layers, Levels layers, Brightness/Contrast layers and Black & White layers. For example, dark buildings in a photo are lightened whilst maintaining the original sky colour.

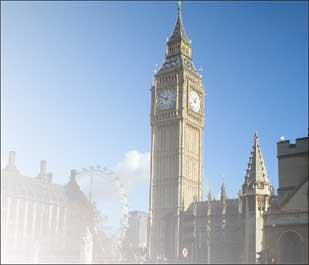
Chapter 12: Colour Adjustments
Students are shown some of the professional colour adjustment tools that Photoshop provides to repair the colour in poorly taken photos. The Match Colour tool the Vibrance tool and the Curves tool are used to repair the following photo of a building which had a bluish tinge to it.
Chapter 13: Saving Files
Students are shown a variety of different ways Photoshop documents can be saved and exported, including saving TIFF files, JPEG and GIF formats, the Export command, saving individual layers and using preset canvas sizes.
Project 1: Create a Poster
The Multi-user version provides a project that gets students to apply the Photoshop skills that they have developed to produce a poster on a topic of their choice.
Module 2 Chapter Descriptions
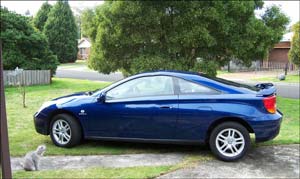
Chapter 14: Repairing Images and Moving Content
Students are shown how to repair scratch marks and to remove an object (a cat) from the front of the car using the Patches tool and the Healing Brush tools. A sticker is removed from the front of the car, other scratch marks repaired and the cat is moved away from the front of the car using the Content Aware Move tool.
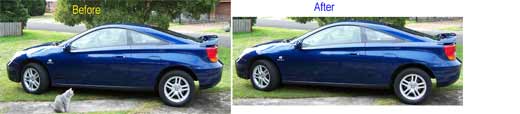
Chapter 15: Removing Objects From Images
The Clone Stamp tool is used to manually remove a cat from in front of a car. The car is then cropped to straightened. The Content Aware Fill tool is then used to automatically remove a dingo from an image of dingoes and the Clone Stamp tool used to complete any minor adjustments.
Chapter 16: Refining Edges
This chapter demonstrates how to use the Select and Mask dialogue box to accurately make selections of objects in a photo, in particular how to select difficult areas such as people's hair or animal's fur. The edge detection brushes and colour contamination tools are used to select a girl in one background and place her over another. Also, how to select skin tones automatically is demonstrated.
Chapter 17: Advanced Layer Uses
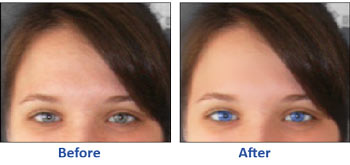
This chapter demonstrates how to use layers to enhance the photograph of a face, including softening skin tones, whitening teeth, highlighting eyes and changing eye colour.
Chapter 18: Applying Filters
Filters including Motion Blur, Gaussian Blur, Reduce Noise and Sharpen are applied to a photo to improve it. The use of Smart Filters is demonstrated which allow applied filters to be edited at a later date, and lighting effect filters are applied to the image, then edited. The Smart Sharpen and Shake Reduction filters, along with Iris Blur, Tilt-Shift and Field Blur filters are also demonstrated.

Chapter 19: Applying Artistic Filters
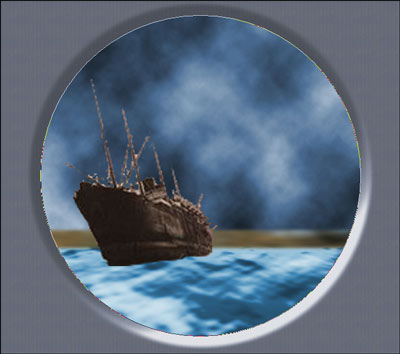
Demonstrates how to use the filters within Photoshop to create artistic sketches. A shipwreck viewed through the porthole of another ship is created.
Chapter 20: The Camera Raw Filter
The Camera Raw Filter allows images not taken in the camera raw format to use the greater artistic control and flexibility of the RAW format. To illustrate this, a JPG image is adjusted using the CAMERA RAW FILTER, including removing objects, adjusting the exposure, etc.
Chapter 21: Sky Replacement and Neural Filters
In this chapter students are shown how to use the Sky Replacement tool to replace skies in photos and then to edit and enhance the replacement sky. Also, Neural Filters are applied to photos to improve skin tones, change facial expresssions and old black and white photos are colourised.

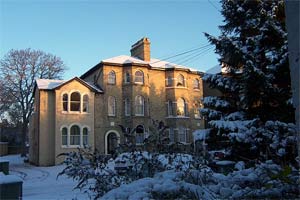
Chapter 22: Working With Perspective
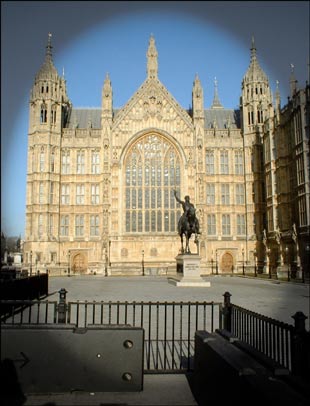
In this chapter students are shown tools that allow the editing of photos, whilst maintaining the 3D perspective of the photo. The Ruler tool, the Lens Correction filter, the Camera Raw filter and the Vanishing Point filter are used to straighten images and remove shadows from the following building.

Chapter 23: Artistic Brushes
Demonstrates how to use the different brushes that photoshop provides to create artwork. The different brush types and settings are demonstrated and students practice using brushes by colouring in the following image.

Chapter 24: Animations
This chapter shows students how to create videos and Animated GIFs within Photoshop. A time-lapse photography animation and the following animated logo for a decorating company are created.
![]()
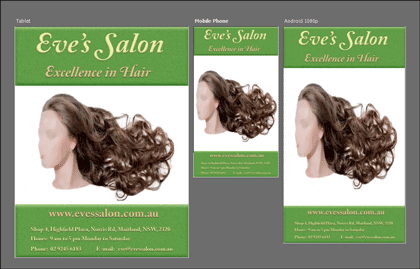
Chapter 25: Using Artboards and Frames
The Artboards feature is used to create advertising materials for a hair salon that can cater for different screen sizes. Students are shown how to create an Artboard file, add content to the Artboard, add extra Artboards, duplicate an Artboard, adjust the size of an Artboard, change the content and export Artboards to Photoshop files, PDFs or image files such as JPEG or PNG.
Frames allow partitions to be creates on the canvas and this is demonstrated by creating a one-page flyer for the hair salon.
Chapter 26: The Curvature Pen Tool
This chapter demonstrates how to use the Curvature Pen tool (which is a simplified version of the Pen tool covered in Module 3) to draw straight paths, curved paths and paths that combine straight and curved paths. Shapes that are created are converted to filled shapes, outlines and selections. A trace of Piggy Bank image is used to practice the Curvature Pen tool.

Chapter 27: Useful Tools
To complete the module some of Photoshop's handy tools are demonstrated, including the Magnetic Lasso tool to select objects within a photo, the Puppet Warp tool, the Replace Colour tools the resize image and canvas tools and the Content Aware Scale tool. The following cat is selected from a background then recoloured and resized.

Project 2: VicSports
The Multi-user version provides a project that requires students to create two pages for VicSports, a government organisation set up to promote sport in schools. Students are required to produce the first page of a web site and an advertising collage poster.
Module 3 Chapter Descriptions
Chapter 28: Reflections and Symmetry
Demonstrates the use of reflections to add depth and realism to images, and the Symmetry tools that Photoshop provides.

Chapter 29: Creating 3D Styles
Demonstrates how to create accurate three dimensional objects by applying a range of styles to them. Those styles are then saved so that they can be applied to other objects and text.

Chapter 30: Graffiti on a Brick Wall
Demonstrates how to create a brick wall from the Texturizer filter then add some graffiti text to it and apply some lighting effects.

Chapter 31: Graffiti on a Building
Demonstrates how to add some graffiti text to a building so that the text matches the perspective of the building. The text is then moved behind some branches and snow to make the text look realistic.

Chapter 32: Creative Text Effects
Demonstrates how to combine text effects into a scene with lighting effects.

Chapter 33: Displacing Images
Demonstrates how to add depth and motion to an image by displacing an image with curves into a 2D flag.

Chapter 34: Blur Animations
Demonstrates how to use blur effects within an animation to create a short advertisement.

Chapter 35: Timeline Animations
Demonstrates how to use the Timeline panel to create animated GIFs. Bouncing icons and an animated mask are created.

Chapter 36: Creating Videos
Demonstrates how to use the Timeline panel to create videos that can be exported for uploading to YouTube, smart phones, tablets or media players. The supplied video clips of the day in the life of a cat are edited, have transitions added to them, have a music sound track included before the clips are exported.

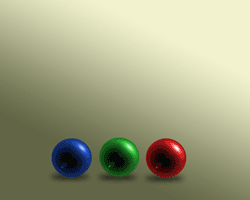
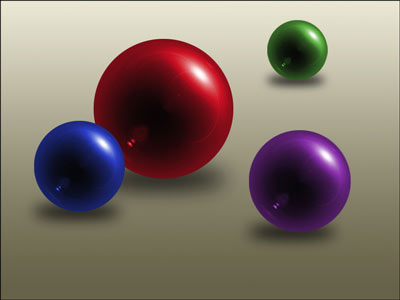
Chapter 37: Creating Balls and Spheres
Demonstrates how to quickly create balls that can be duplicated, resized and have their colour adjusted.
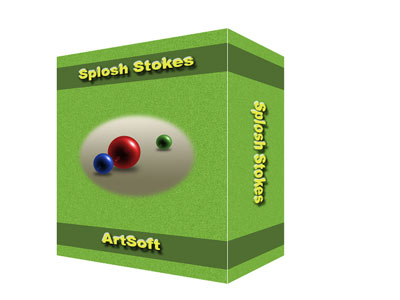
Chapter 38: Creating Accurate Shapes
Demonstrates how to create three-dimensional boxes using Rulers, Grids and Guide lines. The following product box for a software company is created.
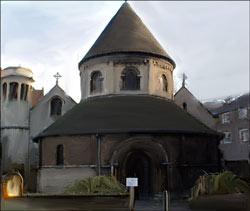
Chapter 39: The Mixer Brush
Demonstrates how to use the Mixer Brush tool to mix brush colours and canvas colours. Students use the Mixer Brush tool to convert a photo of a 1000 year-old church into artwork.
Chapter 40: The Pen Tool
This chapter demonstrates how to use the Pen tool to draw straight paths, curved paths and paths that combine straight and curved paths. Shapes that are created are converted to filled shapes, outlines and selections.

Chapter 41: The History Panel and History Brush
Students are shown how to use the History panel to remove previous steps or remove individual steps, save snapshots at particular stages of a production, create new documents at particular stages and how to use the History Brush tool.
| Home | Products | iPad | Downloads | Testimonials | Ordering | Contact Us |